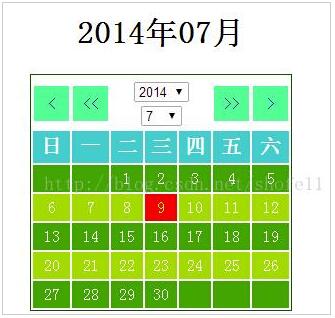
PHP实现简单日历类编写
发布:smiling 来源: PHP粉丝网 添加日期:2022-03-24 11:37:57 浏览: 评论:0
这篇文章主要为大家详细介绍了PHP实现简单日历类编写,文中示例代码介绍的非常详细,具有一定的参考价值,感兴趣的小伙伴们可以参考一下。
用PHP实现日历类的编写,供大家参考,具体内容如下
calendar.class.php
- <?php
- /*
- * 创建一个日历类
- *
- *
- */
- //修改默认时区
- date_default_timezone_set("PRC");
- class Calendar {
- private $year;
- private $month;
- private $day; //当月总天数
- private $first_week; //每月的第一天是星期几
- //构造函数
- function __construct() {
- $this->year = isset($_GET['year'])?$_GET['year']:date("Y");
- $this->month = isset($_GET["month"])?$_GET["month"]:date("m");
- $this->first_week = date("w", mktime(0, 0 ,0, $this->month, 1, $this->year));
- $this->day = date("t", mktime(0, 0 ,0, $this->month, 1, $this->year));
- }
- function showCalendar() {
- // echo $this->year."年".$this->month."月".$this->first_week."天".$this->day;
- echo "<table align='center'>"; //用表格输出
- $this->chageDate("index.php"); //用于用户调整年月份
- $this->weekList();//显示星期
- $this->dayList(); //显示天数
- echo "</table>";
- }
- //1、显示星期
- private function weekList() {
- $week = array("日","一","二","三","四","五","六");
- echo "<tr>";
- for ($i = 0; $i < count($week); $i++) {
- echo "<th>".$week[$i]."</th>";
- }
- echo "</tr>";
- }
- //2.显示天数
- private function dayList() {
- $color = "#2ca50c";
- echo "<tr>";
- for ($i = 0; $i < $this->first_week; $i++) { //输出空格,弥补当前月空缺部分
- echo "<td bgcolor='#2ca50c'> </td>";
- }
- for ($k = 1; $i <= $this->day; $k++) {
- $i++;
- if ($k == date("d")) echo "<td id='nowd'>".$k."</td>"; //是今天,加效果
- else echo "<td bgcolor=$color>".$k."</td>";
- if ($i % 7 == 0) {
- echo "</tr><tr>"; //每7天一次换行
- if ($i % 2 == 0) $color = "#2ca50c";
- else $color = "#9ddb27"; //实现各行换色的效果
- }
- }
- while ($i % 7 != 0) { //将剩余的空格补完
- echo "<td bgcolor='#2ca50c'> </td>";
- $i++;
- }
- echo "</tr>";
- }
- //3、用于用户调整天数
- private function chageDate($url="index.php") {
- echo "<tr>";
- echo "<caption><h1>".$this->year."年".$this->month."月</h1></caption>";
- echo "</tr>";
- echo "<tr>";
- echo "<td>"."<a href='?".$this->prevYear($this->year,$this->month)."'>"."<"."</a>";
- echo "<td>"."<a href='?".$this->prevMonth($this->year,$this->month)."'>"."<<"."</a>";
- echo "<td colspan='3'>";
- echo '<select οnchange="window.location=\''.$url.'?year=\'+this.options[selectedIndex].value+\'&month='.$this->month.'\'">';
- for ($year = 2038; $year >= 1970; $year--) {
- $selected = ($year == $this->year)?"selected":"";
- echo '<option '.$selected. ' value="'.$year.'">'.$year.'</option>';
- //echo '<option '.$selected.' value="'.$year.'">'.$year.'</option>';
- }
- echo "</select>";
- echo '<select name="month" οnchange="window.location=\''.$url.'?year='.$this->year.'&month=\'+this.options[selectedIndex].value">';
- for($month=1;$month <= 12;$month++){
- $selected1 = ($month == $this->month) ? "selected" : "";
- echo '<option '.$selected1.' value="'.$month.'">'.$month.'</option>';
- }
- echo '</select>';
- echo "</td>";
- echo "<td>"."<a href='?".$this->nextMonth($this->year,$this->month)."'>".">>"."</a>";
- echo "<td>"."<a href='?".$this->nextYear($this->year,$this->month)."'>".">"."</a>";
- echo "</tr>";
- }
- private function prevYear($year, $month) { //获取上一年的数据
- $year--;
- if ($year < 1970) $year = 1970;
- return "year={$year}&month={$month}";
- }
- private function prevMonth($year, $month) {
- if ($month == 1) {
- $year--;
- if ($year < 1970) $year = 1970;
- $month = 12;
- }else $month--;
- return "year={$year}&month={$month}";
- }
- private function nextYear($year, $month) { //获取上一年的数据
- $year++;
- if ($year > 2038) $year = 2038;
- return "year={$year}&month={$month}";
- }
- private function nextMonth($year, $month) {
- if ($month == 12) {
- $year++;
- if ($year > 2038) $year = 2038;
- $month = 1;
- }else $month++;
- return "year={$year}&month={$month}";
- }
- }
主页 index.php
- <!doctype html>
- <html>
- <head>
- <meta charset="utf-8">
- <title>日历显示</title>
- <style>
- table {
- border:1px solid #050;
- margin: 100px auto;
- }
- th {
- width: 30px;
- background-color: #0CC;
- color: #fff;
- height: 30px;
- font-size: 20px;
- }
- #nowd {
- color: yellow;
- background: #F00;
- }
- td {
- width: 30px;
- text-align: center;
- height: 25px;
- color: #fff;
- }
- a {
- display: block;
- width: 35px;
- height: 35px;
- background: #0F9;
- text-decoration: none;
- text-align: center;
- line-height: 35px;
- }
- a:hover {
- background: #CF0;
- color: #fff;
- font-size: 20px;
- }
- </style>
- </head>
- <body>
- <?php
- include "calendar.class.php";
- $ca = new Calendar();
- $ca->showCalendar();
- ?>
- </body>
- </html>

Tags: PHP日历类
- 上一篇:php+mysql实现的无限分类方法类定义与使用示例
- 下一篇:最后一页
相关文章
- ·非常简单的日历类(2013-12-11)
- ·PHP实现的简单日历类(2021-05-01)
推荐文章
热门文章
最新评论文章
- 写给考虑创业的年轻程序员(10)
- PHP新手上路(一)(7)
- 惹恼程序员的十件事(5)
- PHP邮件发送例子,已测试成功(5)
- 致初学者:PHP比ASP优秀的七个理由(4)
- PHP会被淘汰吗?(4)
- PHP新手上路(四)(4)
- 如何去学习PHP?(2)
- 简单入门级php分页代码(2)
- php中邮箱email 电话等格式的验证(2)
